
We were asked recently to write up a tactical fix for addressing “Tag out of sequence” errors in image files.
It seems like the sort of thing that others might find useful, and so this blog is a record of that method.
We are sharing it for comment and discussion. At the end of the post we’ll talk a little bit about the implications of the method for collection items.
The steps in the process assume zero knowledge and windows working environment. You might want to skip a few steps if you’re comfortable with command-line operations.
You’ll need the excellent exiftool, download and extract.
You’ll also want the excellent JHOVE to check your work. (I’m not going to go through JHOVE installation – the working assumption is you installed it OK).
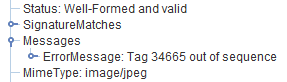
It would be useful to find an image that has the tag sequence issue. We found one in our collections that is open access

Lets get setup.
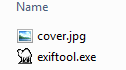
Make a folder somewhere useful. In that folder place your image(s) and the exiftool executable.
Next up, open up commandline (“start menu” > type/find “cmd”). Navigate to the folder you just created:
c:>cd "c:\my_folder"

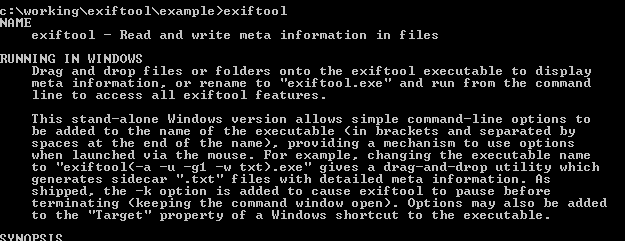
Test exiftool works by typing exiftool and you should see a dump of all the commands you can use.
Try pointing exiftool at your image:
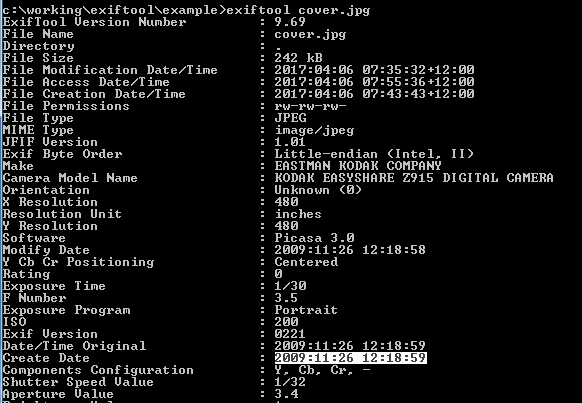
c:>exiftool cover.jpg
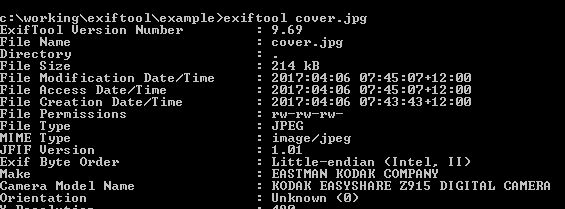
You should see metadata relevant to your file. You can save this data to a text file with the following command:
c:>exiftool cover.jpg > cover_metadata.txt
This “pipes” the metadata in a new file called cover_metadata.txt. You can use whatever filename makes sense to you.
Now would be a good time to check the image in JHOVE. Fire up JHOVE and take a look at what it says (drag and drop your file onto the GUI)
We’ve seen how we can view the metadata via exiftool. Lets look at how we might start to address the sequence issue.
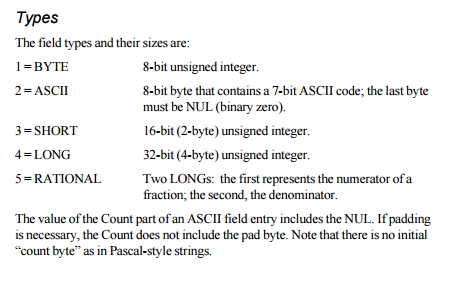
The error is reported by JHOVE because tagged image formats require the tags to recorded in numerical sequence order. The tags are essentially the data containers that hold each of the little bits of data that comprise the metadata/information we’ve just exposed via exiftool/JHOVE. On the surface it looks like the tags are maintained as named items inside the file, when actually, each of the tags is assigned a number, the tag number and its corresponding value or property is recorded into the file. The image parser finds the number, looks up its label, and then processes the information accordingly. For example, the TIFF standard has some useful baseline tags. Each of these tags has a code – so the metadata field “ImageWidth” has the numerical code 256 (decimal) / 0x0100 (hexadecimal). If we cracked open a TIFF file with a hex editor we wouldn’t find the text “ImageWidth” as a searchable entity, but we would find the tag code 0x0100 if we knew where to look.
Having established that the informational parts of the TIFF are organised as tags, and those tags are numerically organised within the file, it means we can now go and find that tag in the binary….
Exiftool again has your back. If you use the -htmlDump option you get a nice piece of HTML that you can use to figure out there your tag is in the noughts and ones:
c:>exiftool -htmlDump my_tif.tif > my_tif.html
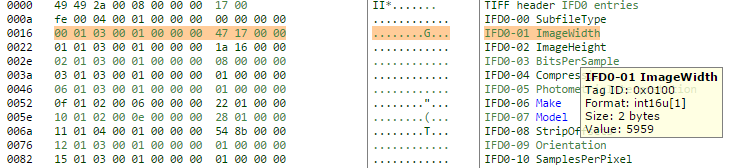
We can see the tag number is the first two bytes (they are arranged in swapped order – so we are expecting to see 0x0100, in reality the file gives us the least significant byte first, 0x00 and then the most significant byte, 0x10 second. Stringing them together in significance order gives us ox10 0x00, or really 0x0100 which is the tag number we started looking for… We need to do the same trick for the value section of the tag (the 9th and 10th bytes, 0x47 and 0x17. Swap the order, string them together we get 0x1747 (hexadecimal), or 5959 (decimal). Magic! The bytes we’ve not explored are structural parts of the tag, describing the data type, and length of the data element.
From the screen dump we can also see that the tags are arranged numerically. This is no accident. The TIF standard is very clear about the sequence it expects tags to be discovered it:
Sort Order
The entries in an IFD must be sorted in ascending order by Tag. Note that this is not the order in which the fields are described in this document. The Values to which directory entries point need not be in any particular order in the file.
https://www.itu.int/itudoc/itu-t/com16/tiff-fx/docs/tiff6.pdf
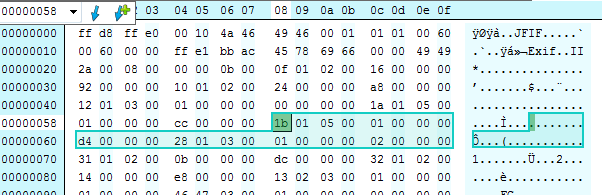
This is the heart of the issue. Lets go back to our original cover.jpg, and look for the tag that JHOVE is reporting as being an issue – here tag number 283 (or 0x011b hexadecimal) is reported as being out of sequence. Lets take a look at the binary in a hex viewer, and see where the problem lies. I have highlighted the tag that is in the wrong place (note that its actually tag number 0x0128):
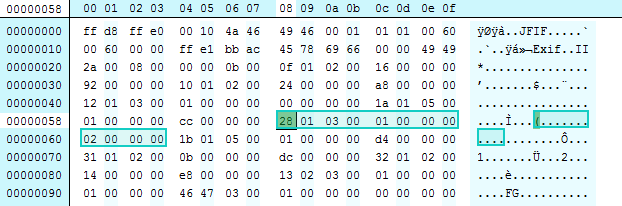
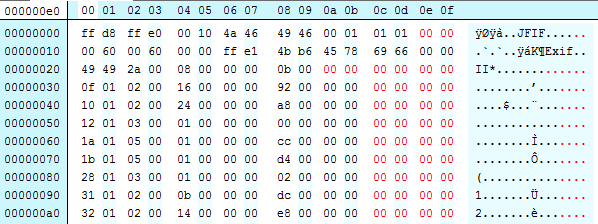
If we pad the binary to make it more readable it might become clearer. Ignore the red bytes, these are added to show each tag on a new line to more clearly de-mark them:
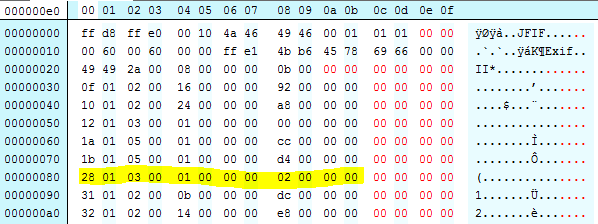
And just to be super clear, we can light the problem:
If we look at the previous graphic, and extract the the first two bytes of each row (swapping them over to account for endieness) we can see the sequence order:
[Tags start on the 3rd line of the graphic, first value below is the “raw” bytes, then rearranged, then decimal, then the tag name]
- of 01, 0x010f, #271,”Make”
- 10 01, 0x0110, #272,”Model”
- 12 01, 0x0112, #272,”Orientation”
- 1a 01, 0x011a, #282,”XResolution”
- 28 01, 0x0128, #296,”ResolutionUnit”
- 1b 01, 0x011b, #283,”YResolution”
- 31 01, 0x0131, #305,”Software”
- 32 01, 0x0132, #306,”ModifyDate”
- …
Hopefully we can see where tag #296 comes before #283. JHOVE reports #283 as the problem because its counting up from #296.
Perhaps we could fix this by swapping the two tags over? In the hex editor we can do exactly that:
Lets pad out the binary with some inserted zero bytes (in red) to try and show what happened more clearly:
And just to be super clear, we can light the same tag:
Lets throw the resulting binary at JHOVE:
Voila! no errors or warning. The image seems to render OK. This might be a viable fix.
We’ll cover of some notion of validation at the end. Lets look at how we might get this fix without doing the heavy lifting ourselves…
Using the -htmlDump function from exiftool we can look at the tags / binary quite simply. Lets look at the original file:
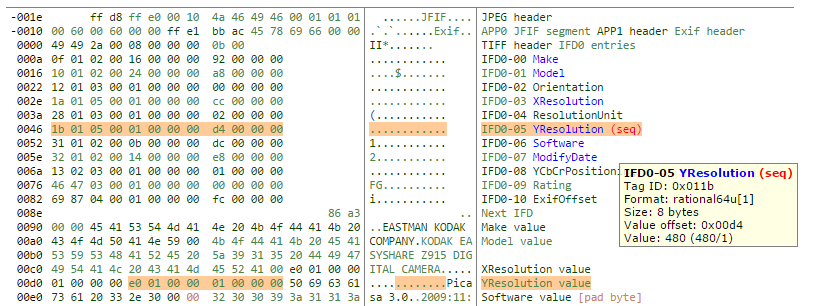
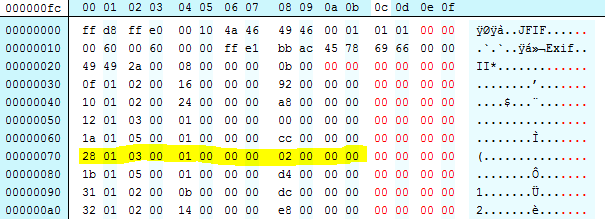
This is a <b>really</b> useful view of the file in question. I have highlighted the problem tag. We can see two interesting things. Firstly, exiftool has indicated that there is a problem with the red (seq) text. We can visually parse the file and see exactly what tags might have issues. Exiftool also highlights where the tag data is found. Without getting too far off topic, some tags are comprised of contiguous bytes, with all the relevant data being found in neighboring bytes. Where the data is too long for the relatively small reserved area for the core data for each tag, instead of a value, an offset is recorded to elsewhere in the file, and thats what we can see here. The offset recorded in the tag is 0x00d4 (see 9th and 10th bytes in the first highlighted row). Exiftool has highlighted the data at the offset found at 0x00d4 in the second section. The length of the offset is recorded in the 3rd and 4th byte of the tag, 0x05 and 0x00 (0x0005 really, remember the swapping?) in this case, setting the tag type to be #5:
https://www.itu.int/itudoc/itu-t/com16/tiff-fx/docs/tiff6.pdf
We should see that the the offset contains 2 x LONG elements, and one LONG element is 4 bytes, giving us 8 bytes total. Referring back to the exiftool -htmlDump thats exactly what we see highlighted at the offset.
OK. If exiftool can understand that the tags are out of sequence, can it do anything about it?
The easiest way I found to use exiftool to have a whack at this problem is to get exiftool to re-write the exif data for a given file. This can be triggered by changing / adding / removing a data element. I haven’t found a way of asking it to just re-prove the exif for a file, so for now we would consider the following approach.
Using exif tool, display the metadata for a file (using c:>exiftool cover.jpg) and copy the Create Date (not the File Creation Date/Time). We use this because its an expected piece of data. You can use any field you feel comfortable playing around with. You might feel the dates fields are too highly prized to be abused in this way, and use something else like “Make” or “Software”. Its worth knowing that some fields are protected, so you can’t just change things like MIMEType via this method. Explore, report back whats working for you!
We can use this information, and ask exif to “change” the modified date to being the existing date. Exiftool doesn’t check for diff, and essentially treats the date a new piece of information, re-striking the exif in the process.
This is the command:
exiftool -"createdate"="2009:11:26 12:18:59" cover.jpg
Hopefully it’s pretty clear whats happening. We’re asking exiftool to change/add the the exif field Create Date with the value 2009:11:26 12:18:59 for the file cover.jpg effectively giving back the same piece of data.
When we do this, two things happen. Exif tells us whats its doing, and in this case reporting a sequence issue that its detected…

The original file is renamed my_file.ext_original and a new file is created with the original filename.
Now we need to validate that we’ve lost or changed anything, and that we’ve corrected the error.
First – lets check the new file with JHOVE:

That seems like success – that warning has gone away.
We can’t use fixity of course to check our work because we know we’ve changed the bits… so lets look at some other methods.
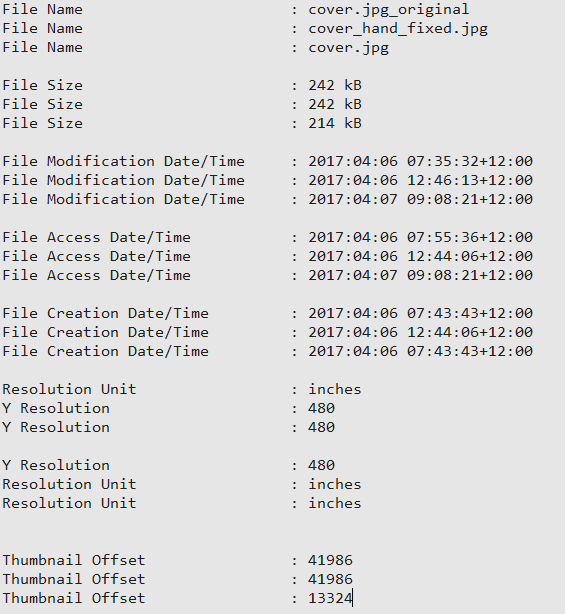
First up, lets look at file sizes. We’ll check 3 files, the original, hand fixed, and exiftool fixed:
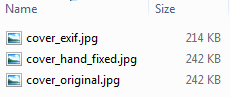
Oh… that looks worrying. The exiftool fixed version is missing 28KB of data! Thats 11.6% of the original file size! Whats going on here. Has exiftool re-compressed the file? removed some metadata?
We can check all of that. First lets establish a policy/principle position. The file is important. But for this exercise the information contained inside the file is more important. We understand there is (at least) two informational planes within this file, the image as an abstract concept expressed as the image payload, and the metadata about the file expressed as lumps of various metadata found within the file (including perhaps exif, xmp, TIF, jpeg etc). If we can establish that these are our areas of interest we can work on ensuring we have not lost anything of importance/significance.
Lets start with the image. This should be straight forward. We have two images that ought to be identical bit for bit, pixel for pixel. We could extract the binary payload from the images and check fixity values that way, but for now we’re going to use a different method and check the images in the “image” domain by comparing each of generated images with the original and comparing their respective RMS errors. In both cases we expect to see an RMS of zero if there has been no changes to the image.
To demonstrate the veracity of this method (and to baseline the test) we took the original image and made a couple of extra versions – adding a little line to make a small difference,


filling it with black pixels,

and inverting the colours.

All designed to show the types of error values we should see if there are any changes in an image.
To do this we’ll use some Python script.
rms: 0.0 - Source images: cover_original.jpg vs cover_original.jpg
rms: 0.0 - Source images: cover_original.jpg vs cover_exif.jpg
rms: 0.0 - Source images: cover_original.jpg vs cover_hand_fixed.jpg
rms: 110.0 - Source images: cover_original.jpg vs small_line.jpg
rms: 119774.374505 - Source images: cover_original.jpg vs all_black.jpg
rms: 9064.91665709 - Source images: cover_original.jpg vs inverted.jpg
Voila! No errors in the files we “fixed”. Hopefully this convinces us that in the image domain, we have not lost or changed any information.
Next up, the metadata. This is a little trickier… lets see what we can do with the text exports from exiftool…
Using the command exiftool -a -u my_file.ext > my_text_file.txt we can export all the metadata as a block of text.
Using another little python script we can test each line looking for changes:
OK. Not a lot of changes here, and we can account for all of these.
All the fields prefixed with “File” are understandable. We’re minting new files. (These bits of data could also be reverted if needed – nothing is really lost in this process)
The next two are the very ordering issue we’ve addressed, so “Resolution Unit” and “Y Resolution” have switched places.
The only interesting one is the “Thumbnail Offset”. Effectively in the exiftool fixed version, exiftool has allowed itself to move the binary lump that houses the Thumbnail image to a new location inside the file. That’s probably OK assuming we not regarding the original ordering of the bits as being imperative to maintain.
So whats happening here? where are these 28KB?
As ever, exiftool comes to the rescue:
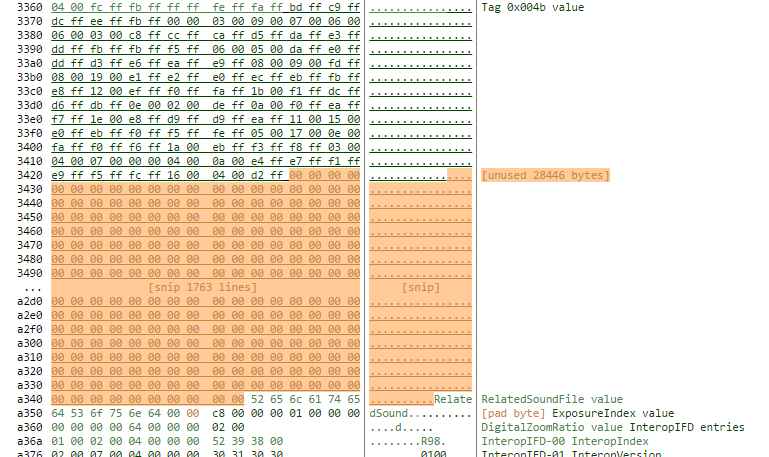
Way down deep in the original file there is a 28KB block that not used for anything useful. We can find this section in the hex editor and see its just zero bytes – there is nothing salient in the region, and the image file being parsed as an image file expects no data in this area. When exiftool regenerates the file, it is dropping this block (and a couple of other much smaller padding sections).
The important questions for us are… does this matter? and should we be OK with addressing structural/technical issues with a file if we can demonstrate that the informational planes that really matter to us are protected?


April 28, 2017 @ 12:11 am CEST
Tyler Thorsted suggested a cleaner exiftool call that can be used:-
exiftool -all= -tagsfromfile @ -all:all -unsafe -P -overwrite_original