Some recent Twitter discussions led to me explaining how The National Archives’ CSV Validator (and CSV Schema Language) could be combined with a CSV file exported from a DROID report to detect duplicate digital files based on their checksum. Rachel MacGregor has written this up in her blog post Seeing double.
This general idea could be extended to carry out various checks that would be useful to digital archives, not least verifying that there have been no changes to stored files, and no additions or removals of files (there are of course other free tools to do this such as AVP’s Fixity, but if you’re already generating a DROID report for characterisation then taking this approach with CSV validation means you don’t need to re-read everything to initially generate checksums). You could also highlight files that have not been identified at all, or only identified by extension (though you might want to whitelist certain formats such as text and csv that can usually only be identified by format), or files that have received multiple identifications: both these cases suggest that the formats may need further research. This could also be done using the filters available inside DROID, but if you wanted to set up a more automated pipeline as part of your workflow, the CSV validator approach could help. Another possibility would be flagging last modified dates outside an expected date range, or flagging the presence of particular file formats that represent system generated files that are unlikely to be of long-term value such as thumbs.db on Windows machines or .DS_Store on Macs.
Where to start
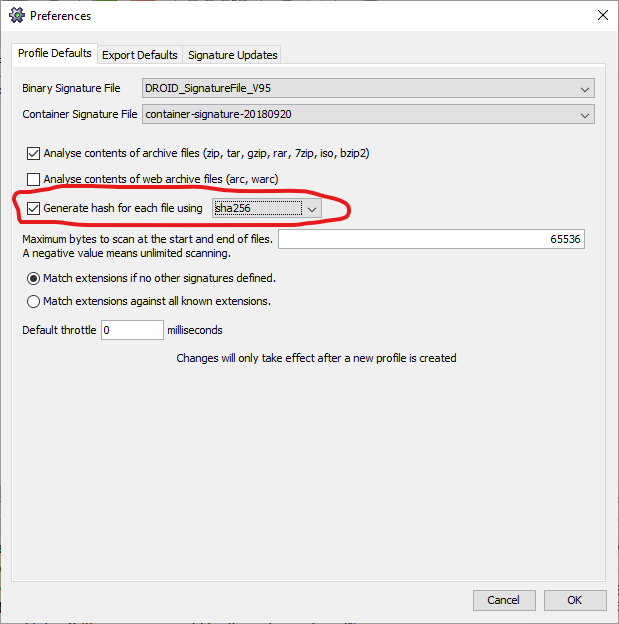
To do this we need a DROID report (including checksums) exported as CSV (You can download DROID here – both DROID and the CSV Validator need JAVA installed) . DROID does not switch on checksum generation by default, so if you’ve not already enabled it, use <ctrl>+<shift>+P (or equivalent on other operating systems, or from the menu bar, Tools > Preferences…) to open the preferences dialogue box. Then select the check box labelled “Generate hash for each file using” and select an appropriate cryptographic hash function from the dropdown to the right of that label. DROID offers md5, sha1 and sha256 (as of version 6.4). Significant attacks exist against md5 and sha1, so those are probably not suitable for long term verification of your content, so sha256 is probably the best choice of those available. Note the warning that “Changes will only take effect after a new profile is created”, so after clicking OK, also create a new profile by clicking the white plus in a green circle (labelled New) in the DROID toolbar. As we’ll see below, having analysis of the contents of archive files such as zip, tar etc in your DROID CSV can cause difficulties using the CSV Validator to check the integrity of your collection, so you may also wish to uncheck the box that turns that option on while you’re here (two boxes above the one for switching on checksum generation). If you’ve already got a DROID report with those rows in you can filter them out by manually deleting the rows in the CSV (I’d recommend using LibreOffice Calc for this, and make sure you set all columns to be treated as text on opening the file), and if you’ve already carried out the deduplication of files based on a DROID report, you could delete the rows relating to deleted duplicates at the same time. This may be quicker if you have a large collection, otherwise you could obviously just rerun DROID to generate a clean copy of the export CSV.
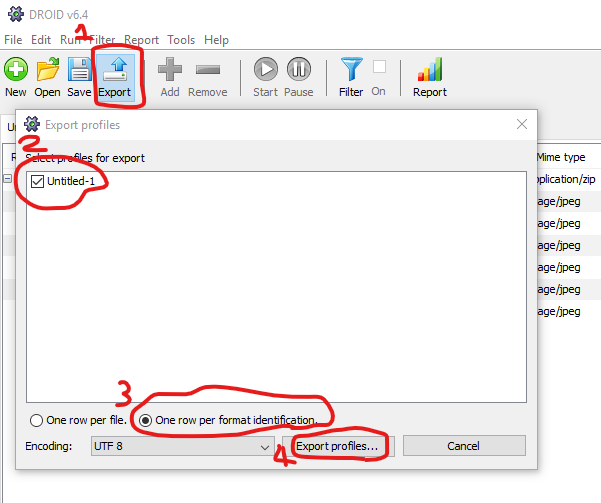
Due to the way the file integrity check works within CSV Validator you need to choose a single folder as the starting point for DROID, so click the green plus labelled add in the toolbar and select your top-level folder, then click Start in the toolbar. For the purposes of using the CSV Validator we need to choose the option to export a row per format ID, rather than a row per file, otherwise you can get variable numbers of fields across the rows of your CSV file, which the validator does not like (as RFC 4180 states that a CSV file should have the same number of fields in each row). So, once the DROID run has completed, follow the steps indicated in the image (at step 2 make sure you select only the relevant profile), and then save your CSV file from the standard dialogue box that will open once you’ve clicked “Export profiles…” (you’ll need to manually add the .csv extension)
Where to find example files
To make this all a bit easier to follow I’ve created some example DROID CSV files and also a folder structure with a small number of example files. These can be found in the droid-csv-schema GitHub repository.
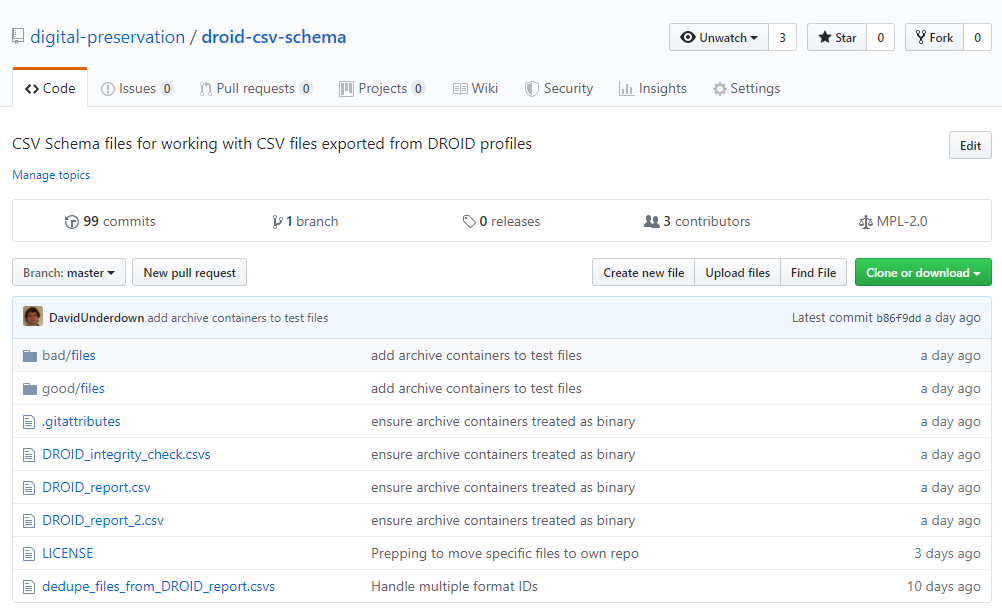
The two folders contain copies of the sample “files” folder. In the “bad” folder deliberate changes have been introduced so that the errors that would be flagged in the event of DROID_integrity_check.csvs finding problems can be demonstrated. The “good” folder is an exact copy of the original folders structure and its contents. The .gitattribute file should ensure that the text files within the “files” folders do not have their line endings changed if you clone/download the repository onto a non-Windows machine (which would introduce its own set of file integrity issues as this would change the checksums of those files). DROID_report.csv is a DROID export which includes analysis of files inside archives (such as .zip, .tar etc), DROID_report_2.csv excludes this analysis. The .csvs files are the CSV Schemas that allow the CSV Validator to highlight potential issues that you wish to examine.
If you’re familiar with GitHub, feel free to clone the repository (and indeed pull requests for additional schemas or revisions to the existing ones will be welcomed). However, just downloading the files is sufficient for following along with this blog. Clicking the green”Clone or download” button will open a menu with a “Download ZIP” option in the bottom right.
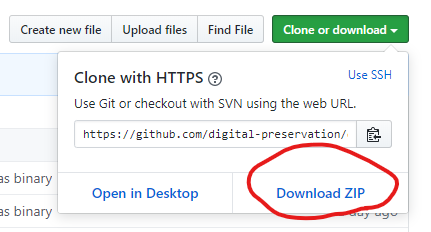
Click “Download ZIP” and, depending on your browser settings, a zip of the repository will either be downloaded directly to your “downloads” folders, or you will be given the option as to where you want to save the zip.
Using the CSV Schemas in CSV Validator
Instructions and download links for CSV Validator can be found on GitHub Pages. The initial demos below will describe how to use the GUI version, but I’ll then move on to describing how to run the tool at the command line, as that will allow automation for regular running of the schema against your collection to validate integrity on an ongoing basis, so you need to download the application.zip for both csv-validator-ui and csv-validator-cmd. I also wrote an introductory blog post when we first made the version 1.0 release.
Here I’ll concentrate on the DROID_integrity_check.csvs as Rachel has already looked at dedupe_files_from_DROID_report.csvs in her blog post. The key parts of the schema are shown below (omitting columns which don’t have checks defined):
 version 1.1
//several columns omitted here for clarity
URI: fileExists integrityCheck("","files","includeFolder")
//replace "files" in integrityCheck with name of top level folder within your DROID report (in quotes)
SHA256_HASH: if($URI/ends("/"),empty,if($URI/starts("file:"),checksum(file($URI),"SHA-256"),notEmpty))
//folders do not have a checksum, and CSV validator cannot access files in containers
A CSV Schema always has a version declaration. For the purposes of the file integrity check we only need to perform checks on two of the fields in the CSV export, URI and SHA256_HASH, so the other fields have been omitted here, but are necessary for a valid schema. Please refer to the full CSV Schema language specification for details on the other tests that can be defined.
There are two elements to the test on the URI field (linked by an implicit and statement):
- fileExists
- This checks the file system for a file at the URI in this row of the CSV file
- integrityCheck
- the options following this say:
- do not add a prefix to the URI,
- the top level folder to check from is called “files”,
- folders in the folder structure are explicitly mentioned in the CSV file
- Any files or folders in the folder structure below the top level folder given which are not explicitly referenced in the CSV file will be considered an error by the CSV validator.
- the options following this say:
For SHA256_HASH there is only really one test, checksum for which we have to supply the file path, here by referring to the URI field, the prefix $ means “use the contents of the following field”, and stating the relevant checksum algorithm. However, because folders do not have a checksum we use the if condition to exclude these from checking (and further assert that in this case the checksum field should be blank) by looking to see if the URI ends with a /. We also check that we are actually dealing with a file URI.
Using the CSV Validator
However, there are a couple of subtleties that are not immediately apparent. If you examine DROID_report.csv you will see that my “files” folder was a top level folder on the C: drive. If you download the droid-csv-schema repository as described above and unzip it, assuming you can write directly to your C: drive (or equivalent) you’re probably going to find the files are actually at something like C:/droid-csv-schema/good/files/ (and indeed C:/droid-csv-schema/bad/files/), in fact you may be forced to put them at some user location like C:/users/david/droid-csv-schema/….
This means that if you simply tried to run CSV Validator having selected the CSV file and schema the fileExists and checksum checks would all fail as the files are not located at the filepath indicated by the URI. Fortunately we always knew that this could be an issue as we are usually receiving files from other government departments so the file paths once files have been transferred to The National Archives will be completely different, so we devised the concept of path substitutions.
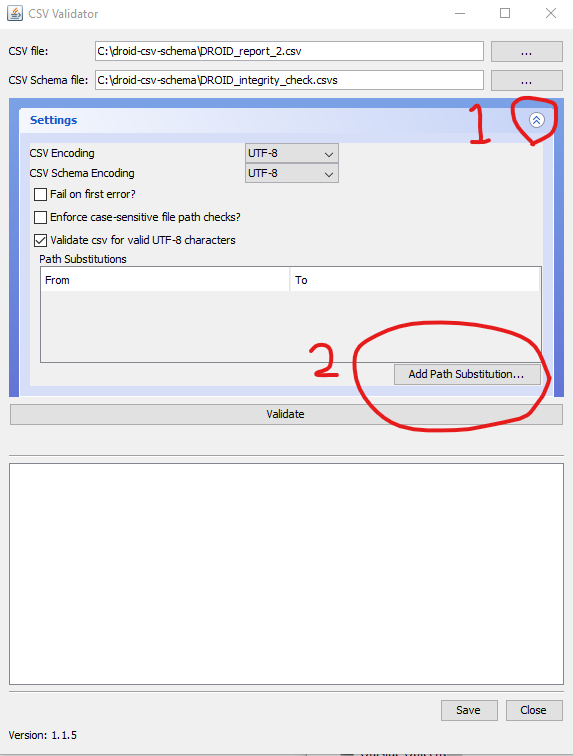
Enter the original part of the path that you wish to be replaced in the From: box, so here file:/C:/ and then the new path segment that should replace it, file:/C:/droid-csv-schema/good/ (or whatever the path to your “good” folder is) and click OK. Then you should be able to click “Validate” and get a “PASS” result. Note that we are still working with URIs, so if any of the folders in the path have a space in the name that would need to be replaced with the URI encoded form %20 and likewise for other characters that cannot be represented directly in URIs. This also applies to the name of the top level folder in the schema, so if you were creating your own DROID report based on a folder called “my files” rather just files you would need to have “my%20files” in the integrityCheck statement.
Using the GUI is quite useful for checking a new set of digital material when it’s first transferred from a donor (ideally you’d have been able to create the DROID report on the donor’s system and it can then serve as a manifest for the transfer, it’s worth using tools such as TeraCopy to provide some validation of the copying process itself too), but if you want ongoing automated checking you’ll need to use the command line version of CSV Validator, a batch (or shell) script and a scheduling tool such as Windows Scheduled Tasks or cron (you may well need help from local system administrators in order to be able to set such jobs up). The basic command will look something like (write this in a text editor and save as eg integrity_check.bat):
call c:\csv-validator-cmd\bin\validate.bat -p file:/C:/=file:/C:/droid-csv-schema/good/ C:/droid-csv-schema/DROID_report_2.csv C:/droid-csv-schema/DROID_integrity_check.csvs > C:\reports\integrity_check.out
On unix-based systems use the shell script called validate that’s also in the bin directory. Here we use the -p option to specify the path substitution as a key-value pair, the original path segment we want to replace is immediately followed by the equals sign and the new path segment. If you need to use URI encoded replacements for things like space as mentioned above, be aware that in Windows batch scripts the percentage sign, %, is an escape character, and there is a first round of replacement in the batch script itself, and then again when the command defined by the call statement is actually executed so you actually have to write %%%%20 to correctly replace a space (it’s only the path substitution which needs URI encoding, if there are spaces in the path to validate.bat or to the CSV or schema files, wrap the path in quotes instead). The final part of the command > C:\reports\integrity_check.out diverts output that would otherwise just be displayed on screen to a text output file so you can review the results afterwards (you can probably also using the scheduling tool to check the return code of the job and flag failures directly).
You may have realised that because the top-level folder name has to be included in the schema you will need a separate schema for each individual digital collection. This is slightly unfortunate in some respects as the schemas are otherwise identical, but does mean that you could schedule different collections for checking on different nights. You could have multiple collections within the same task by extending the script to include multiple call statements (make sure the reports are easily identifiable, perhaps by including the name of the relevant top-level folder in the report filename).
I will try to add some further CSV Schemas that could be useful in future (such as those described in the intro to this post). These will be described in the README.md in the droid-csv-schema repository as I create them.


January 6, 2022 @ 4:50 pm CET
Dear Mr. Underwood,
Thank you for your reply. I’ve built a small test case and was able to recreate the error.
After that I checked for Java updates and downloaded the latest version (1.1.5) from GitHub (I was using the file called: CSV-validator-ui-1.2-RC2).
The problem disappeared and the test file passed.
January 5, 2022 @ 4:51 pm CET
Hi. I’m afraid I can’t recall seeing that exact error message before. A couple of things to check, is the value in $URI a valid URI, and would it resolve to a file rather than folder? Do you know what version of Java you have?
January 5, 2022 @ 2:49 pm CET
Latly i’ve been getting the following error:
I’m unable to identify the source of the problem.
Error: checksum(file($URI), “SHA-256”) Found class scodec.bits.ByteVector, but interface was expected for line: 2, column: SHA256_HASH, value: “[insert hashcode]”
Anybody know whats going on?
Note that the replaced the actual hashcode with “[insert hashcode]”
July 25, 2019 @ 6:36 pm CEST
I had this issue and used Long Path Tool and it has been solved
July 4, 2019 @ 12:52 am CEST
I highly recommend Long Path Tool it automatically deletes the folder you selected, including all its files and subfolders, regardless of their path length (even if they are in a network folder).